You may receive an ESRI Shapefile collection from a GIS user for a data source in generating a surface. This is typically a ShapeFile Type 1 (Point) or Type 2 (Polyline) which contains the XY values in the .SHP file, along with the elevations in a field of the associated .DBF file.
- Civil3D Users: See the procedure below.
- MapWorks Users: See the new tool at bottom.
Civil3D: While Civil3D has a built in tool to do this, it’s a little less than intuitive how to proceed, so we put together a step-by-step procedure to follow.
- Initialize the tool from the Home ribbon panel, choosing Surfaces drop down, then “Create Surface from GIS Data”.
- Optionally change the name of the resulting surface and other parameters in the first panel.
- Click [Next] to continue to the second panel.
- Choose the SHP Radio button at the top.
- Click the […] button to select the actual .SHP file. Notice that the [Next] button is currently grayed out.
- Click the [Login] button to connect to the data, and the associated .PRJ file should be read and show at the top. Click the checkbox on the top item so you can continue.
- Click the [Next] button to continue. You will be presented with area limiting options. In the event that you know the results area and have zoomed to it, you can use one of these options. If you don’t know the area, simply uncheck the “Define Area” toggle at the top.
- Click the [Next] button to continue. You will now need to select the database column containing the elevations. Hopefully the names are intuitive enough to be able to select one. To the right of the logical name, choose the drop down and choose “Elevation”.
- Finally, click the [Finish] button to complete the process. It may take a few seconds and once the dialog disappears, you may need to zoom extents to see the result. Hover over areas of the surface and watch for tool-tips near the cursor to confirm the elevations appear correct.
MapWorks: There is no reason why users of plain AutoCAD, BricsCAD or IntelliCAD should not be able to handle this situation, so we added a way for them to handle it in (what we consider) an easier and quicker way.
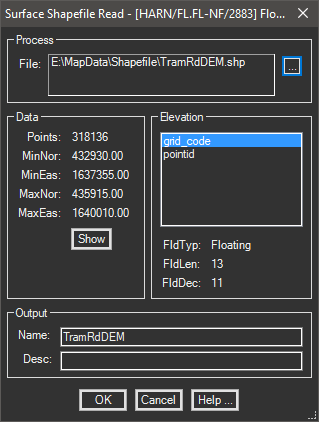
This tool (added to MapWorks 9.0) uses a single panel dialog. Simply select the .SHP file, choose a field to use for the elevation, confirm the surface name, and [OK] to begin.